How to identify a quality shirt

A quality shirt is an essential item in any wardrobe. Whether you’re dressing for a formal occasion or just a casual outing a well-made shirt can elevate your style and stand the test of time. However, with countless options available on today’s market it can be challenging to determine which shirts offer true value. Instead of focusing solely on brand names or price tags, it’s important to pay attention to the finer details. In this guide, we’ll highlight the key features to look for when evaluating a shirt, helping you make an informed decision and invest in a piece that will last for years to come.

1. Pattern

If you are looking for a shirt with a striped or checked design, it’s easier to spot quality craftsmanship by checking how the patterns align across the seams. For instance, examine the placket (the double layer of fabric holding the buttons on the front), the yoke (the upper part around the shoulder area) and also where the sleeves meet the shoulders. If the patterns are properly matched across these key areas, it’s a good indication that the manufacturer has put effort into ensuring the shirt’s overall construction is of high quality.

matching pattern on shirt sleeve

2. Stitching

Stitch density is another key indicator of a garment’s quality. A high quality shirt typically has around 8 stitches per centimetre, while a lower quality shirt may have only 3-4 stitches per centimetre. However, this doesn’t always apply to summer shirts, as a higher stitch density can damage lightweight, delicate fabrics.

You should also check for stitch line consistency, particularly along the hem at the bottom of the shirt. Irregularities like wavy stitch lines or varying stitch densities are signs of poor sewing.

Additionally, a well-made shirt will feature single needle stitching. This is more time consuming but results in a cleaner, neater finish. In contrast, double needle stitching, which leaves two rows of stitching, can lead to puckering after multiple washes.

3. Buttons

Pay attention to the buttons. A button should never be sewn flat to the fabric, as this can make it difficult to button up and also cause puckering or splaying around the button hole. Instead, all shirts should have a bit of space underneath to create what is known as the ‘shank’ or the ‘neck’ of the button. A 2.5mm shank is ideal.

To prevent the button from falling off the shirt, the shank should also be wrapped, which secures the main sewing threads and stops them from unravelling. The best way to ensure a button stays securely attached is by using heat sealed button wrapping thread. This fuses together with heat, creating a strong, everlasting bond. Some shirts use cotton thread for wrapping, but this looks messy and can come undone overtime just like your shoe lace. By inspecting the underside of the button, you can identify which method of wrapping was used. If the shank is neat, tidy and has colour matching thread, it’s a sign that the shirt has been well made.

shirt button wrapping

4. Buttonholes

A buttonhole is a reinforced opening in the fabric that allows the button to pass through and secure two pieces of fabric together. The perfect buttonhole features a high stitch density with clean, smooth edges and no fraying. While most buttonholes are machine made, hand stitched buttonholes can be found on high-end bespoke shirts. Although hand-stitched buttonholes may have slight irregularities, they reflect the craftsmanship and time invested in creating such a shirt.

5. Sleeves

A low-end shirt often features larger armholes, designed for a one-size-fits-all approach, which helps reducing manufacturing and stockholding costs. Meanwhile, high-end shirts offer a more carefully considered range of sizes to ensure a tailored, perfect fit.

6. Fabric

To assess the quality of cotton, inspect closely. High quality cotton features thin, dense threads with well-defined ridges and grooves that catch the light giving the fabric a soft lustre. Poor quality cotton on the other hand appears fuzzier, with blurred ridges and grooves due to looser, hairier threads. A quality fabric should also feel soft to the touch. The best way to test this is by trying the shirt on – the fabric should follow your moves and not feel stiff or restrictive.

For more information, don’t hesitate to give us a call or reach out via the contact form. While MMS specialises in button wrapping machines and heat sealing thread, we are passionate about all aspects of garment manufacturing and are always happy to assist.

A short history of button wrapping

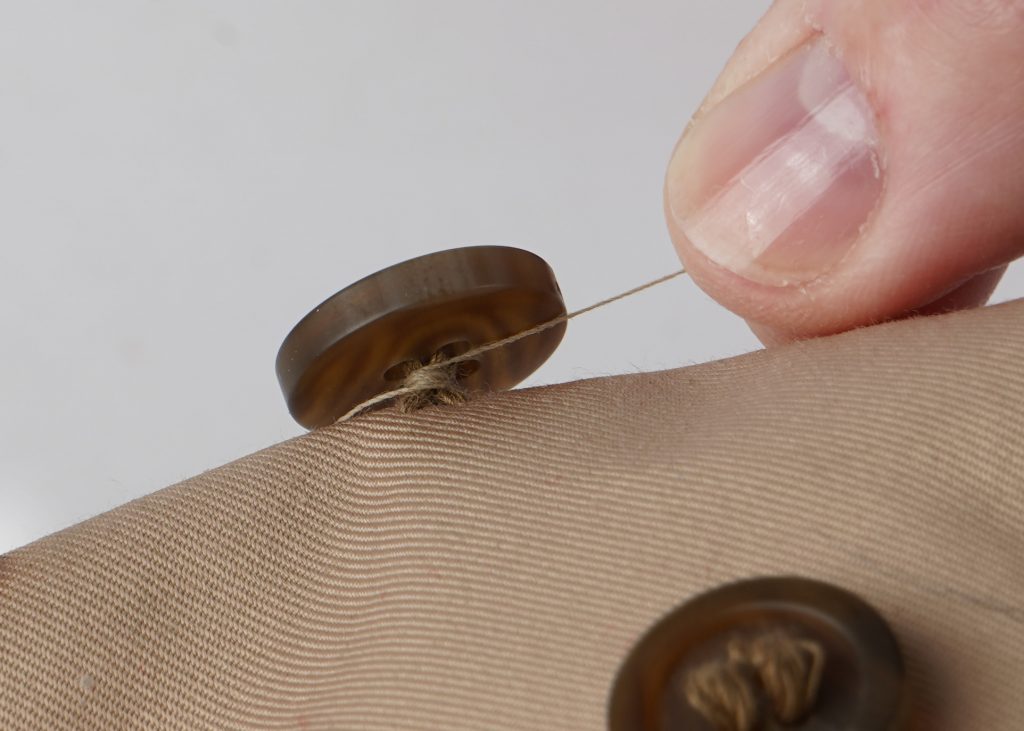
Before machinery, buttons were sewn on by hand. This was laborious but it usually resulted in reliable button attachment because it was common practice to manually wrap and knot the main sewing threads at the end to completely secure the button.

When machinery became available however, it was not felt necessary to wrap the button neck after attaching because it was presumed that modern machines attach buttons reliably without the need for a secondary securing operation. In fact, whether you are using a chainstitch or a lockstitch button attaching machine the button is not always 100% secured. Even a lockstitch machine can be unreliable because the loop may not form correctly which may cause the threads to become undone, or the bobbin may run out of thread without the operator realising which will also cause future button loss. Therefore the only way to guarantee button security is by wrapping the main sewing threads multiple times to prevent them from unravelling.

The traditional method of wrapping a button by hand is effective but time consuming

Clothing brands realised the importance of button security after customers started complaining about loose buttons. Button wrapping quickly became a requirement and garment manufacturers needed a productive and cost effective solution. Many attempts have been made to find a better alternative to hand wrapping, the most significant of which are listed below.

Button Winding Machine by Charles J Sibbald, 1935 (USA)

Most likely the first of its kind was an invention by Charles J Sibbald in 1935. Sibbald’s design proposed that the button attaching and wrapping could be one combined operation whereby the free end of the thread is also used for winding. Although the concept led to inconsistent results it suggested ways to automate the wrapping process.

Button Winding Machine by S. W. Avis, 1945 (USA)

This was a complex machine developed by Reece Button Hole Machine Company, Boston. It used a needle which passed through the fabric forming a loop underneath before making its windings around the button neck with an up and down movement. At the end of the cycle the needle passes back under the fabric pulling and tying the thread loop and leaving all loose ends of the thread underneath the fabric. It aimed to prevent the windings piling up and also stop the thread fraying. The invention could also accommodate buttons of varying diameters.

Original patent document for a button winding machine by S. W. Avis (Source: Google Patents)

Sewing Machine with Wrapping Attachment by PFAFF, 1981

PFAFF registered a patent for a sewing machine with an integrated attachment to wrap button shanks. It was capable of wrapping different length shanks, it also had an auto thread trimmer fitted. Another all-in-one attempt at attaching and wrapping the button but the end result was messy with button security still not guaranteed.

Elastomeric thread winding device by Andre J. Shaerer, 1991

This new approach to button wrapping used a different kind of wrapping thread with 500% elasticity. The elastomeric thread is wrapped whilst applying tension around the main sewing threads to achieve a strong and constant gripping force. The button stem is also kept to a minimal thickness due to the 0.2mm diameter thread becoming 0.04mm after stretching meaning no messy clumps of thread underneath the button.

Once the wrapping is complete the thread is pulled at a right angle beyond it’s yield point and the thread winding remains fixed due to the firm clamping, overlapping and twisting of the coils. The device was handheld and portable enabling it to be used wherever convenient, even during the quality control stage.

This elastomeric thread became widely known as ‘Ascolite’ after the Swiss company who developed it. Ascolite later added a revolutionary thermo-fusible outer layer to the thread so that when heat is applied the wrapped yarn bonds together and prevents button loss for the lifetime of the garment. Ascolite initially developed their own machine to wrap and heat the thread however these machines were cumbersome to use.

Simple button wrapping device using elastomeric thread (Source: Google Patents)

Automatic wrapping and heat sealing machine by Mason Small, 1997

In 1997 Mason Small, founder of MMS, designed the world’s first automatic heat sealing button wrapping machine called the MMS MK7. This was designed to be used with Ascolite thread and it became the most efficient and reliable button securing method at the time. MMS + Ascolite formed a partnership togetherMMS manufactured the machines and Ascolite produced the thread.

As Ascolite thread became more widespread around the world, MMS continued to develop the machines. The Mark 8 followed and then in 2006 the MMS Mark 10 machine was launched, a much more compact machine designed specifically for wrapping shirt buttons. The MMS Mark 11 machine followed which was a very reliable machine for wrapping a wide range of button types on shirts, jackets, pants, blouses and coats.

Early button wrapping machine from the Ascolite MMS cooporation

In 2014 Ascolite and MMS parted ways. Since then, MMS have continued to produce the world’s favourite button wrapping machines and now also produce their own heat sealing button wrapping thread. After over 30 years of design and development, MMS are now a world leading brand for button wrapping in the garment industry.

MMS buttonfuse solo button wrapping machine launched in 2020